So I’ve been searching for the perfect toddler T-shirt pattern for a while. I’ve tried making my own, and I never get the neck proportion right. I also tried sizing down a larger kids’ pattern to fix my Max (who is almost two-and-a-half). But the results were less than great.
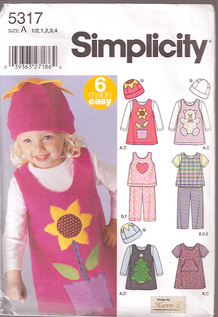
Finally, I’ve found my go-to T-shirt pattern and I love it! It’s Simplicity 5317, and though the main draw of the pattern is probably the cute jumper, the T-shirt is just right for what I need.
Finally, I’ve found my go-to T-shirt pattern and I love it! It’s Simplicity 5317, and though the main draw of the pattern is probably the cute jumper, the T-shirt is just right for what I need.
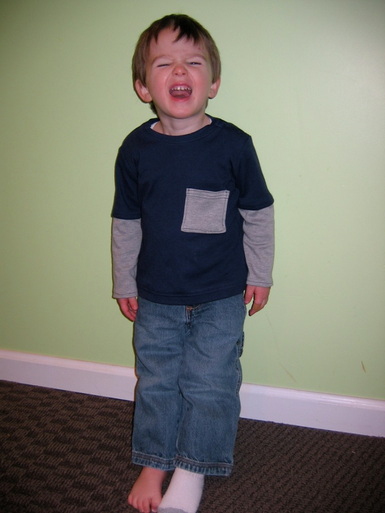
I first made the shirt for Max’s SuperWhy! costume for Halloween, which I wrote about here. But now I’m making him some versions (without the fancy SuperWhy! logo) that he can wear to preschool or around the house. Here is my first attempt (and don't ask me where his other sock is).
I think my problem with my own pattern attempts was that I was making the neckband too wide, and not under-stitching the right way. (This pattern leads you through how to under-stitch, if you don’t know what I’m talking about, though I don’t think it calls it that.)
For this version, I decided to do faux layered sleeves, since that seemed to add a good “boy” element. It’s very simple to do: I just folded the sleeve pattern piece at the line where it says to cut for short sleeves, and added a half-inch at the bottom for the hem. I cut two sleeves (from the main fabric) using that. Then I re-folded the sleeve pattern piece so that I was cutting just the bottom part of the sleeve, and I added about a half-inch at the top for the seam. I cut two sleeve bottoms out of my contrast (grey) fabric. To make the sleeve: I folded the bottom edge of the top sleeve piece under 1/2” and pressed. Then I placed the top raw edge of the bottom contrast piece flush with the top raw edge of the fold on the wrong side and stitched it. That way, you’re hemming the top part of the sleeve and attaching the bottom part in just one step.
I also added a pocket—just a basic 3 – 1/2” square, top-stitched all around, with multiple lines of top-stitching in contrasting thread (I actually didn’t do that great of a job keeping these lines perfectly straight). I was considering getting rid of the snaps on the shoulder because the neck hole seemed large enough, but then I realized that the snaps would prevent the neck from getting stretched out. Oh, I also had to add length to the bottom of the shirt—about two inches. (I still took a 1 – 1/4” hem.)
I used Jo-Ann’s Sew Classic Knit fabric (I think this is it), which I love because it’s super soft, but not so flimsy as to be difficult to work with. They often run it 40% or 50% off. If you want more info on finding knits, check out Meg’s excellent post on knits at Sew Liberated.
I’ve got more knits and more T-shirt customizing ideas. Next up: creating stripes!


 RSS Feed