How to put in a zipper

Figure 1
This is my go-to method for zippers. It works great for pillows, skirts, bags, purses, and some pockets (there are other methods for hidden pockets). It’s fast, easy, and not at all scary! Using your machine’s zipper foot will make it much easier, and don’t skip the hand-basting step (the pins will not be your friend if you leave them in).
1. Pin your two pieces of fabric together (ex: if the zipper is going in the center back seam of your skirt, pin that seam together). The size of your zipper (7-inch, 9-inch, etc.) dictates how much of the seam you’ll machine baste and how much you’ll sew with a regular stitch.
1. Pin your two pieces of fabric together (ex: if the zipper is going in the center back seam of your skirt, pin that seam together). The size of your zipper (7-inch, 9-inch, etc.) dictates how much of the seam you’ll machine baste and how much you’ll sew with a regular stitch.
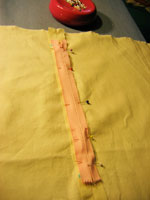
Figure 2
2. Lay the zipper against the pinned seam. Mark (with a pin or chalk) a little below the top of the zipper tape and just below the metal clamp at the bottom. Move the zipper out of the way. (Figure 1)
3. Give yourself at least a 5/8-inch seam to work with. Begin sewing the seam with a regular stitch, but when you get to your first mark, take a few backstitches, and then switch to a machine-baste stitch. Machine-baste until you get to the second mark. Again, take a few backstitches, and then switch back to your regular stitch.
Remember: If you’re working on a smaller project (like a purse), you might be machine-basting the entire seam if it’s just a 7-inch zipper. If that’s the case, don’t forget to immediately switch your machine back to its regular stitch when you’re finished.
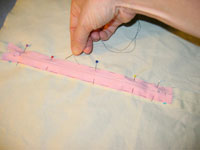
Figure 3
4. Press your seam open.
5. With the wrong side facing you, center the closed zipper face down over the seam. The teeth should be right up against the seam. Pin the zipper in place. (Figure 2)
6. Key step: hand-baste the zipper in place. I like to hand-baste right at the edge of the zipper tape. Pivot your hand-basting around the bottom of the zipper. Since it’s going to be your guide for stitching the zipper in place, baste just below the metal clamp, so you don’t sew over it. (Figure 3)

Figure 4
7. When you’re done basting, remove all the pins.
8. Flip it over so the right side is facing you. Using a zipper foot on your machine, stitch zipper in place on the right side of the fabric, between an 1/8-inch and a 1/4-inch away from seam (or just clearing the zipper teeth). Start at the top, right where your machine-basting starts (maneuvering around the top stop can be tricky, but using a zipper foot helps). (Figure 4)
8. Flip it over so the right side is facing you. Using a zipper foot on your machine, stitch zipper in place on the right side of the fabric, between an 1/8-inch and a 1/4-inch away from seam (or just clearing the zipper teeth). Start at the top, right where your machine-basting starts (maneuvering around the top stop can be tricky, but using a zipper foot helps). (Figure 4)
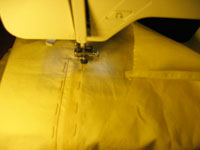 Figure 5 |
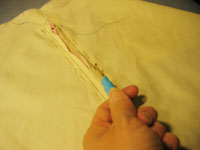 Figure 6 |
9. Stitch all the way down to the bottom and pivot (be careful not to sew over the metal clamp—you can break a needle that way); sew back up the other side. (Figure 5)
10. Rip out the machine basting first (you’ll see the teeth emerge—exciting! It worked!). Make sure your zipper works. Then rip out hand-basting. (Figure 6)
10. Rip out the machine basting first (you’ll see the teeth emerge—exciting! It worked!). Make sure your zipper works. Then rip out hand-basting. (Figure 6)
