CraftGossip.com did a lovely write-up of my video for Sew Retro today (thanks, CraftGossip!). I thought I'd use the opportunity to do a post about making this video--why I decided to do one and what the process was like. This is based on the guest post that I wrote for my colleague Kelly Watson's excellent One Woman Marketing blog last month. It's perfect timing for re-purposing though! After recently interviewing both my agent and acquisitions editor for some blog posts here and here on selling craft book proposals, I've learned that things like videos are even more important than I realized. You can watch my video here.
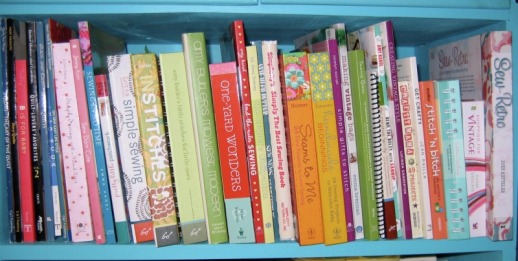
The Initial Inspiration I’m a total junkie for sewing books. I love looking through them for inspiration and ideas. However, I make good use of the library, and I’m pretty selective about what I’ll buy. I was browsing Amazon one night, when I came across Anna Maria Horner’s video for Handmade Beginnings: 24 Sewing Projects To Welcome Baby. I watched her three-minute video, and immediately fell in love with the book and everything about her, her adorable family, and the great projects for mamas and babies. Approximately two seconds later, I clicked on “Add to Cart.” Maybe it’s because I’m expecting myself, but I had to have this book now! There is no doubt that the video sealed the deal for me.
This got me thinking: maybe there is something to this video thing after all. I know, as writers, being in front of the camera is the last thing most of us want to do. But at least for craft books, there is something extra special about the audio-visual dimension. Getting a quick snapshot of an author, seeing them talk about why they wrote the book, and then seeing some of the projects off the page and in real life grabs readers’ attention way more than a press release. Anna Maria Horner hooked me. Maybe I could use the same process to hook other people, I thought. Both my agent and publisher thought it was a great idea, too.
Getting Started Through some local networking, I found a reasonable videographer, and started thinking about venue. I decided to shoot the video at my house, primarily in my office/sewing space. I wanted the right balance between homey and professional—I didn’t want it to look amateurish, but also, I didn’t want to be pretentious. After all, my sewing space is the place where I sew; it’s honest, and—along with my home in general—it says a lot about me and my retro tastes. Of course, I knew I’d have to clean, de-clutter, and style, but luckily these are things I’m pretty good at since I’ve produced dozens of home and garden stories for magazines.
Next, I wrote a script for myself. I tried to pretend like I was talking to friends over drinks: what would I want them to know about Sew Retro? I wanted the script to sound conversational, but still polished. It took several drafts to strike the appropriate tone, and I had to keep recording myself into a digital recorder and reviewing it until it felt like it had the right mix of breezy and smart. The final script was about 500 words, and took about three minutes to read. (Amazon suggests you keep videos between two and three minutes; five minutes is the cut-off.)
I also tried to practice being on camera, propping my cheap little digital camera on top of my printer and sitting there in my office chair talking (an extremely painful exercise, I admit). The hardest part about being on camera is trying to look and sound natural, when it feels anything but natural. Luckily, on the day of the shoot, my wonderful Web designer, Beth Kaiser, was on hand to art direct and help me relax in front of the camera. Also, I am a very unfussy person and wear only hints of makeup, but I knew that I’d come off pasty and uneven on camera without the right makeup. I’m very glad that I hired a makeup artist to get me camera-ready; it was well worth the $60.
My Camera Debut The shoot itself took about half the day. I first read the script four or five times, with just the audio taping (for voice over). Then it was time to talk on camera, and we went through each paragraph about five times (just to make sure that we had enough usable takes that could be cut and pasted). We also got various shots of me sewing and/or working with fabric, as well as snapshots of my sewing space and the various projects scattered around the house and garden. I desperately wanted a shot of my two-year-old sitting calmly on the Groovy Patchwork Throw quilt outside, flipping through a book. But, of course, he had other ideas. (We were able to get about five seconds of footage of him before he had a meltdown.) So much for readers falling in love with my family! But I had to remind myself that the focus of my book was retro sewing and why we love retro, not the adorableness of my toddler (who, of course, is the cutest toddler ever in the history of toddlers).
A Good Promotional Tool I’m really pleased with the final result, and feel like it was worth the $850 investment (honestly, I didn’t do any research on what videographers charge for this kind of thing, but the estimate seemed reasonable, so I just went with it). My publisher is still working on getting it up on Amazon (apparently, it's gotten a little more difficult to get videos up). I have it embedded in my site, and the publisher’s blog, and it's on YouTube as well. As craft bloggers interview me or mention Sew Retro, I’m hopeful they’ll do a link to the video, too.
I certainly hope the video will help sell more copies of Sew Retro (the anecdotal feedback I’ve gotten so far suggests that it could), but regardless, it gives me something I’ve never had before: an on-camera clip, which should come in handy as I try to book TV appearances. Doing the video pushed me way outside my comfort zone, but that’s good. As writers, most of us can spin out endless articles and copy without breaking a sweat. It’s good to do something that challenges you—and just might translate into more book royalties down the line.
Oh goodness, I knew that this was a pretty awesome giveaway, but I had no idea it would get this kind of response, as in 600+ comments! (My biggest worry was that I was going to go into labor over the weekend and not be able to pick a winner on Monday and leave all you Michael Miller fans dangling. But alas, still pregnant.) It just goes to show how fantastic Michael Miller prints are, and how fabulous all of the Michael Miller designers are! And on that note, let me thank Sandi Henderson, Paula Prass, and Patty Young for promoting the giveaway on your blogs. Thanks also to CraftGossip.com. And of course, thank you to all the fine folks at Michael Miller for partnering with me on this giveaway. Special thanks to Kathy Miller, for doing the Q&A to begin with, and then for being so lovely to work with.
So, on to the winner! I enjoyed reading the comments so much, and I wanted every single person to win! I stressed greatly about how to choose the winner. Let my 2-year-old randomly point to a comment? Hmm. Little hands near the laptop? Not so much. So I told my husband to pick a day and a time and then I found the comment in my email folder that corresponded most closely to it. And the winner is . . . Leslie L. (from the AlwaysAloha blog). I have your email and will be contacting you to get your address for mailing the book, and I’ll get you in touch with the Michael Miller folks so you can choose your fabric.
Thanks everyone for participating. I’m sorry only one person could win! But I will most certainly do other book giveaways. So stayed tuned!
Today, I bring you a special treat: a Q&A with Kathy Miller of Michael Miller Fabrics, along with a book and fabric giveaway! This is the same Q&A that ran in Sew Retro, and I thought it would be fun to give you a sneak peek if you haven’t seen the book (there are five other Q&As in the book, too).
Now for the juicy giveaway details: I’m giving away a signed copy of Sew Retro, along with some fabulous Michael Miller fabric, generously donated by the great folks at Michael Miller. This is no ordinary giveaway though! The lucky winner will get to pick which Michael Miller fabric they want! That’s right: you pick it--up to FIVE yards! You can pick five one-yard cuts, or a combination of one-, two-, or three-yard cuts. For a sampling of the fabric available, go to the Michael Miller Fabrics web site and click on New Product, or just follow this link. As giveaways go, this is a pretty darn cool one (I’m jealous that I can’t enter!).
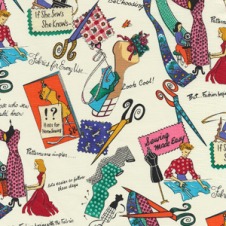
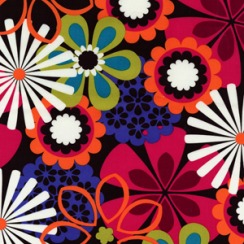
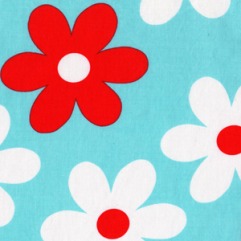
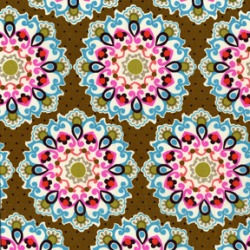
A few thumbnails just to tease you . . .
If She Sews She Knows, from the Michael Miller Essentials 10th Anniversary Collection
Flower Shower, from Jewel Tones collection
Lil’ Plain Jane, from Plain Jane Aqua collection
Emmaline, from The Big E Group
Zelda, from Rouge Et Noir Group
Candy Stripe, from Playdate, by Patty Young
Here’s how to enter: leave a comment here by 10:00 a.m. EST on Monday, August 30th telling me what your favorite ever Michael Miller print is (personally, I’ll never stop loving Dumb Dot, in any color!). I’ll choose the winner at random and let you know Monday morning. Just make sure to leave your email address, so I can get in touch with you if you’re the winner.
And now, I bring you a Q&A with Kathy Miller!
Photo courtesy Kathy Miller; photographed by Kelly Beane
A few years ago, I started noticing all these fabulous retro-inspired cotton prints. The brand was almost always the same: Michael Miller. Who was this Michael Miller, I wondered? I did a little research and discovered Michael Miller is actually the brainchild of Michael Steiner and Kathy Miller. They started the company in 1999. Designer Kathy Miller, who is known for her great eye for color and fabulous design sense, talks about retro influences and how to start a business from a kitchen island.
Q: When did you become interested in sewing and fabric? Miller: I grew up surrounded by fabric, sewing, tons of creativity, and a “if you want it, make it happen” mentality. My mom was a home economics teacher specializing in design and tailoring. I started sewing at an early age, first making doll clothes, and then trying the same technique on my younger sister (I was ten and she was four). She was a willing model: I’d lay the fabric on the floor, and then she’d lay on top of it and I’d cut around her, hand-stitching my creation on her. Raw edges, big stitches—you get the picture! I can still remember the day our parents sat us down and said that as much as they admired my work, they didn’t think it was a good idea for her to be running around the neighborhood in these creations!
We were an Air Force family and moved to Guam when I was in high school in the late 1960s, early 1970s. It was a great time for wild prints—especially tropical prints. I loved to fabric shop, and then run home and make an outfit and wear it right away—luckily my sewing skills had improved by then!
Q: What made you want to design your own line of fabric, and how did the partnership with Michael Steiner come about? Miller: I’m a late bloomer. I didn’t start Michael Miller until I was forty-five. I had majored in Textile Design at the Fashion Institute of Technology in New York City in 1976. After school, I worked as an artist, then assistant stylist, and finally as a stylist at many fabric companies. By then I could see the writing on the wall: different company, but more of the same thing. The money was good, but there was no real job security and I was bored. I truly loved what I did, and figured by then I knew as much as anybody else starting a fabric company. I also figured it was “now or never” since my oldest daughter was three years from starting college (her brother was right behind her). I had three years to get the business off the ground and be able to pay for college (Did I mention I work better with a deadline?).
Michael Steiner and I had worked together for seven years: he in sales, me in design. We knew we made a good team (and we still do). In the beginning, we worked out of his New York City apartment. Luckily his girlfriend (now wife), Camila, and roommate were okay with the kitchen doubling as my studio. I had a designated large drawer that I’d sweep all my supplies into every night. We moved to a real office before I took over the oven for storage! When I had a work table made for the new office, I based it on the kitchen island.
Q: Your fabrics are really eclectic, but most seem to have a retro vibe. Why are you drawn to these kinds of bold, playful prints?
Miller: I’ve always personally enjoyed retro prints. I collect a lot of vintage books and ephemera (all periods). But you’re right, the line is very eclectic. I compare being a fabric designer/stylist to being an actor: as an actor you don’t want to be type-cast. The same can be said for a designer or fabric company. Being known for one “look” or “style” can be very limiting. The joy in having your own company is being able to connect with other fabric lovers in a variety of niches (thus, a healthy business!).
Through years of styling prints for the women’s wear apparel market I learned that “color sells.” When you’re shopping for a blouse on a rack, the only thing you see is the sleeve. The print (and more importantly the color) is what draws you to pull it out from amongst the rest. That was also where I learned that vibrant, strong colors sell. They can survive terrible florescent store lighting.
Q: What is the inspiration for your retro-inspired prints? Where do you get your ideas, and how do you go about bringing them to life? Miller: As for ideas: At this point I’m hardwired for observing everything in relation to trends, color, and design. It’s second nature to me. I’m always on the prowl for good references, and I prefer books, paper, and original vintage artwork. The dealers that know me know that I’m a sucker for the quirky and the beautiful. If it’s well done, I’ll find a place for it. I think over time most designers and stylists develop what I call a “jaded eye,” and after awhile it takes something really different, beautiful, or just plain strange to get you excited.
As for the process of bringing the design to life: When I look at a piece of reference or artwork that I like, my first question is what draws me to it? It could be just one element of it. The design will evolve from there. The color and contrast is a whole other process. The coloration that is sent to the mill for engraving and strike-off (first small swatch to check for engraving and color matching) is really just a rough outline, in my experience. When I receive that strike-off is when I really know what I’m dealing with and where the process of bringing the design to life begins! It’s all in the tweaking and is very much a mental visualizing process (and don’t get me started on why it can’t be done on the computer!).
Q: Since you started Michael Miller ten years ago, sewing among young women has boomed! Has this changed how and what you design, and who you design for? Miller: I’m ecstatic about it! Since the beginning, our main customers have been fabric-aholics. I realized this at my first quilt market. We always figured that good design will find a home, whether it’s for quilting, clothing, or home dec. That’s the fun part about being a fabric company: we create it, put it out there, and then someone else creates something new with it.
We separated our customer service area a few years ago to cater to the new group of entrepreneurial sewers and crafters (I call them “mommy-preneurs”). It started on eBay and then moved to Etsy. It’s a predictable next step for new moms first sewing for their own families, and then as an income source that enables them to stay home with the kids.
Q: Do you still have time to sew? If so, what kinds of things do you like to make? Miller: Sadly I don’t have much time to sew anymore. It hasn’t stopped me from buying fabric though! Most of my sewing now is for quilt markets. We have a big booth and I usually make all the customized lampshades, along with some of the display stuff.
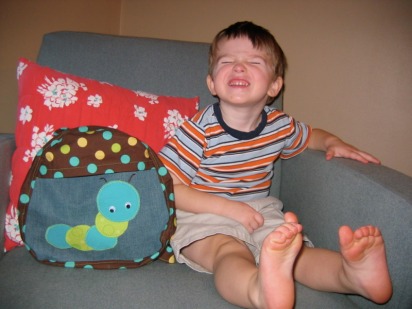
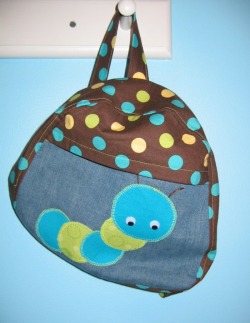
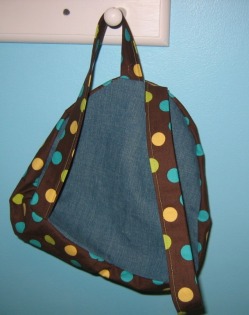
The school supplies are neatly stacked as we anxiously await our first day of pre-school! Without a doubt, Max is most excited by his new backpack. I wrote about it a few weeks ago when I was first planning it, and I have to say, I love, love, love how it turned out! As I mentioned in the previous post, I used this toddler backpack pattern from Indietutes (free, but she accepts donations via PayPal, if you’re so inclined). I definitely recommend this pattern, because it has a super simple shape, without snaps or zippers or anything complicated for a 2-year-old to negotiate. It’s on the small side, and I can see that we might have trouble fitting in larger pieces of artwork, but still, I wanted something that Max could easily carry on his back and not feel weighed down by—so from that respect, it really is the perfect size for a toddler.
I made the majority of the body out of denim, and then used a playful cotton polka dot print for the top flap, straps, and sides. Originally, I was going to line the whole thing, but once I fused all the interfacing to the pieces, I realized it was plenty sturdy as is. As for the pattern itself, the directions are very clear, and the pieces come together quickly and easily. I did modify the straps just slightly: she suggests folding the strap piece right sides together and turning, but I hate turning skinny strips of fabric, so I just pressed the edges up 1/4” and folded in half.
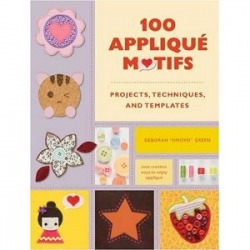
I knew that I wanted to do a fun appliqué, and as I wrote before, I got the idea for the caterpillar appliqué in the book 100 Appliqué Motifs. I simply traced some circular shapes I had on hand (the bottom of a paperweight and the bottom of a bowl) to make the body and head. I admit, my only worry is whether the caterpillar is boyish enough. It is so challenging to sew cute—but stylish—things for boys (I’m hardly the first mom to complain about this!). If you stray from the well-traveled path of basketballs and dinosaurs, it’s easy to start second-guessing yourself, especially when your husband gives you that look. (Anna Maria Horner has a great post about her husband teasing her about the fancy pants she makes for her one-year-old. But I’m sticking with my little lime and aqua caterpillar!
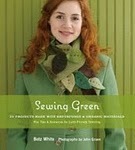
Betz White did a lovely review of Sew Retro on her blog yesterday! (She was also generous enough to do a Q&A with me in the book). Head on over to her blog to see the review and enter her drawing for a copy of Sew Retro! (Warning: give yourself some time to do this, because once you click on her blog and look around at her gorgeous creations, you won't want to leave!) The giveaway ends midnight EST on Sunday, August 22nd. While you're at it, you may want to take a look at her book, Sewing Green. It's become one of my favorites!
For the second part of this two-part series on selling a craft book proposal, I’m offering a Q&A with Margret Aldrich. Aldrich is an acquisitions editor with Voyageur Press/Quayside Publishing Group. I had the pleasure of working with her throughout the whole process of negotiating the deal for Sew Retro and then working on the manuscript.
But before we get to the questions, I wanted to share a little about how the whole process of selling my proposal worked. I had the idea for Sew Retro in the spring of 2007; I met my agent, Joy Tutela, on a trip to New York City in April. She read my one-page summary and loved it; we immediately clicked. (See Part One of this series for awesome tips from her.) I worked on the proposal throughout the summer and sent her the finished draft in September of 07. We worked on revising and sharpening it and then she sent it out in October; we started hearing back in November. The feedback was really all over the place, which was interesting. Some publishers loved the historical narrative concept, but weren’t as interested in projects. Others wanted a more straightforward project book using all vintage materials. And even the feedback on the projects was mixed: one publisher wanted to focus only on clothes, while another thought it would be stronger if it was just home dec/design. One publisher suggested that I team up with designers who made vintage clothing and accessories.
I tried to keep an open mind as we were getting feedback, because I didn’t want to completely discount anything. But I really still believed in the original idea. I was considering revamping the whole thing (or honestly, just scrapping it) when Margret Aldrich from Voyageur got in touch in the spring of 08. She totally got the concept of both projects and narrative and loved the idea. It still took quite a bit of time to negotiate everything (we each had maternity leaves in the process), but we had an unofficial deal by September, and the contract was signed in the next few months (another reason I’m so glad I had an agent: she negotiated every point for me, explained to me why we wanted certain changes, and worked to get the best deal possible in the contract). From the point of signing, I had about six months to finish all the projects, write all the text/instructions, draw all of the illustrations, and gather all of the vintage images. There were certainly moments of chaos and stress, but truthfully, it all went pretty darn smoothly (I’m sure that was due in large part because Aldrich was genuinely excited by the project and very organized).
The process of sending the proposal out and getting my hopes up each time and then having them dashed was rough. And I admit, I did almost give up when I didn’t get the initial “yes, we love this idea!” from every publisher. But once I found the right fit, it all worked and fell into place. My point in all of this is: if you believe in the idea (and your agent believes in the idea—which mine did), and you have solid workmanship, writing, and market data behind it, just keep trying.
As promised, a Q&A with Aldrich, who shares her thoughts on how to wow a publisher with your craft book proposal.
Q: What do you love to see in a craft book proposal? What gets you excited?
Aldrich: For a craft book proposal, fabulous, unique projects are key. I love to see a wide selection of projects with a strong point of view, and photographs are extremely helpful in getting your message across to potential publishers. Take the time to shoot well-lit, semi-stylish photos. (They don't need to be professional, but they do need to show off your work.) Your editor can help shape the organization of your book or your writing style, but the projects need to be solid and special from the get-go. A unique "hook" is also important, because there isn't room on bookshelves for ten books covering the same topic. In addition, I'm thrilled to find an author who is already immersed in the crafting world—perhaps blogging, attending shows, selling wares on Etsy or elsewhere, publishing one-off patterns, contributing to magazines and websites, etc.
Q: Now the flip side: what is a big turnoff in a proposal? Aldrich: Projects or themes need to be ahead of trends, rather than following them. If something has already been done a million times, publishers likely don't want to see it, unless you have a new, unique perspective.
Q: What is the role of digital as we move forward?
Aldrich: Electronic media is becoming more and more important. As bookstores stock fewer books, we need to find new ways to bring an audience to our titles. Publishers are thrilled when authors are already established online through blogs, websites, or social media sites like Facebook and Twitter. After your book is published, a video is a great way to promote it via online booksellers like Amazon. They're like little commercials that can make a reader fall in love with your book. [Me here with a note: check out the video I did for Sew Retro here]
Q: Are there areas in craft books that are really growing?
Aldrich: Sewing is still a hot topic and "designer" sewing shows signs of being on the rise, thanks to shows like Project Runway. In general, handmade and DIY subjects are still solid as readers search for ways to simplify and personalize their worlds.
Q: When you and your editorial board are meeting about a potential project/author, what are the biggest determining factors as to whether the project gets signed or not?
Aldrich: Publishers want to see proof (or at least an indication) that a book will sell. If you're proposing a book to a publisher, include title/author/publisher of other books similar to yours that have sold well. Include articles, facts, and numbers about your subject that prove readers are interested in it. Show that you have expertise on the topic (and ideally a huge following of adoring fans!). But most of all, again, focus on creating fabulous projects that readers will love to make.
Thanks so much to Margret Aldrich for answering my questions.Here are a few links you might find helpful:
My fellow Voyageur author, Jennifer Worick, wrote a helpful article on this topic for Craftstylish.com.
There’s also a good Craftypod podcast on this topic, and she includes a list of resources for more information as well.
I often get asked about how I sold the idea for Sew Retro, so I thought I’d do a two-part series about selling craft book proposals. I know a little something about the process since I just went through it. But I also wanted input from the people working in the industry every day, so both my agent and the acquisitions editor I worked with at my publisher were kind enough to take the time to answer some questions. Today, I’ll offer some tips from my agent, Joy Tutela, who’s been an agent for over a dozen years and represents the bestselling knitting book Mason-Dixon Knitting among other craft titles.
Using an Agent Before we even get to the tips, I wanted to address the process of working with an agent. Not all authors use agents—you certainly don’t have to. But for me, using an agent was a no-brainer. I knew that I didn’t know the book industry well enough to negotiate smartly. I also didn’t know who was who, and which publishers/acquisitions agents I should target (and I didn’t want to spend the time intensely researching it). I also wanted feedback on my proposal. Plus, my agent and I just clicked, and she really believed in the project (I can’t stress enough how important this is). So why do authors sometimes go it alone? Money. The agent takes 15 percent of the advance and royalties (you don’t pay them directly; checks come to the agency on your behalf and the agency takes their cut and then re-cuts the remainder of the check for you). But I found it a smart trade-off and it made good business sense to me. Plus, once you develop a strong working relationship with them, agents can be great at finding work for you.
Strong Ideas So, back to the process of selling your craft book idea! That’s actually the first point to make: you need a CLEAR IDEA and a clear sense of what your projects will be, and that should be spelled out in the proposal. “The projects always have to be of quality, and should be interesting and new,” Tutela says. Don’t bother completing every single project in the proposal stage; instead, pour your energies into creating a strong showing of selected ones, which could be either one completed chapter or a sampling of projects across the different chapters. (Tune into the next installment for tips on how to present your projects to publishers in the proposal stage.) Your proposal also needs to show how your idea is a good fit in the current market, and have a strong “why now?” component—such as a new approach to an old craft, a different twist on techniques, or a growing niche demographic. Some books, like Sew Retro, have a strong narrative component. But all craft books don’t need this. Tutela says there is still plenty of space for straight project books—it just depends on the publisher and what they’re looking for (which is why it’s handy to have an agent who knows how publishers like to fill out their book lists).
Strong Platform Tutela stresses that one of the main things an author needs is a pre-existing audience, whether through a well-read blog (20,000 to 30,000 unique visitors a month will likely impress a publisher), through speaking engagements, through a brick and mortar destination store, or through a strong Etsy shop. “They need something that puts them in front of potential consumers of craft products—something that shows that when the book comes out, they’ll have the opportunity to be heard,” she says. This is often the most challenging part of selling a book—not only do you need the idea, but you need to show that you’ll be able to sell books. In my case, it wasn’t that I had a blog or a shop at the time; rather, I think it was that I had good connections at craft/shelter publications and web sites, and that I was consistently publishing articles about crafts/DIY/ and decorating—and I shaped that into a platform.
Writing Matters Even though craft books are visual in nature, the writing still matters—a lot. “You need clear instructions and good writing. If you can’t deconstruct what you do, find a good technical writer who can,” Tutela advises. She says that there is nothing wrong with positioning yourself as the “idea” person, and then bringing in different people with different expertise for other areas (like design or technical work). Just make sure that you are transparent and upfront.
Think Digital Print isn’t dying, but digital is booming, and print can’t ignore it. Embrace digital in all its applicable forms, Tutela says: videos, multimedia slide shows, podcasts, blogs, etc. If you’re not comfortable with digital, educate yourself and get comfortable, because it’s not going away. “Recently, I have addeda new requirement: a section all about digital play, where the author talks about things like how-to videos or other digital applications. It’s all about how consumers can interact with the community that’s reading the book and how can they have a value-added experience through digital enhancement,” Tutela says.
Embrace the Crafting Community The crafting world truly is a community: book authors support and reference each other constantly. That’s somewhat unique to the craft book world. Get familiar with who is who, (humbly) find your place in the community, and always be generous. “The best craft books are seeking to inspire the reader to get the techniques by doing the craft in the book. But it’s really only a launching board for the reader to figure out their own artistic position,” she says. Think of your craft book as part of a larger discussion and experience—not as the be-all and end-all of everything.
Realistic Expectations Lastly, keep it real. Writing craft books won’t make you rich. It doesn’t have to bankrupt you either, of course. But keep your expectations about advances realistic, Tutela says. “You really need to understand the costs of things like photography. It’s a huge investment for publishers, and they tend to be fairly modest in supporting these books today,” she says. “I don’t think anyone should set out to write a craft book to make a lot of money; it has to be part of an overall strategy about where they want to be in the craft marketplace, whether it’s lecturing/teaching, or having a business/studio that relates to their book.”
So there you go: some advice to get you started on your craft book proposal journey. In the second part of this series, I’ll bring you tips from the acquisitions editor I worked with at Voyageur, as well as some links to more information about writing and selling craft book proposals.
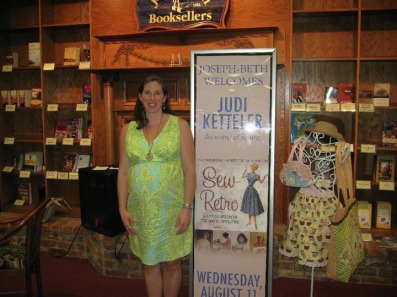
I sold and signed a few books at the CHA show in Chicago a few weeks ago. But the signing at Joseph-Beth Booksellers last night was my first full-scale book signing, complete with a (short) reading from the book and a little talk about sewing and its history, plus audience questions. I admit, I was a little nervous, but seeing so many friends and family in the audience was lovely! In fact, it was thrilling to see such a good turnout—half were people I knew, but the other half were people I didn’t know who had heard about Sew Retro and were excited enough about it to come! Of course, my biggest problem is that the baby is absolutely crushing my diaphragm at this point, and I lose my breath really easy when I’m trying to read. So hopefully, I didn’t frighten anyone with my scary out-of-breath talking!
I have to give props to Joseph-Beth for making me feel like sort of a big deal! That’s the benefit of working with a hometown bookstore: they take care of and support their local authors. And the great news is that after all was said and done, they only had one copy of Sew Retro left! I know there are many places to order the book online, but if you want to order through Joseph-Beth, you can, right here.
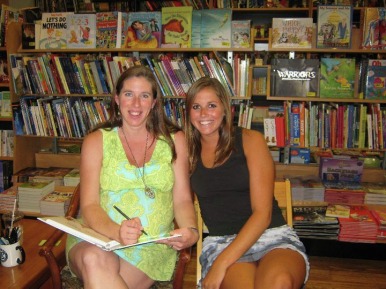
I wasn’t exactly sure how the evening was going to work itself out. But it turned out splendid. My sister, Laura, ran the make-and-take Fabric Flower Pin while I chatted with people and signed books. What would I do without her, seriously? (She has a job already, but I definitely feel she could launch a new career in publicity!) My niece, Rachel, was running around snapping pictures (I look enormous in most of them, but such is the state of being 36 weeks pregnant), and I’ll post those (the most flattering at least) soon! (Update: I've posted some now, but none are flattering!) Everyone was just so sweet and complimentary and excited about Sew Retro. I was also really excited to meet the ladies from the Cincinnati Modern Quilt Guild. I hope to get involved with them after things settle a bit.
Thanks to everyone who came out, and to everyone who has bought a copy of Sew Retro! Now go sew something fabulous!
With my adorable niece, Rachel. Oh, to be 21. And skinny. Sigh.
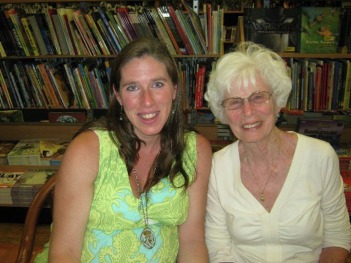
With my mom, the woman who taught me everything I know about sewing!
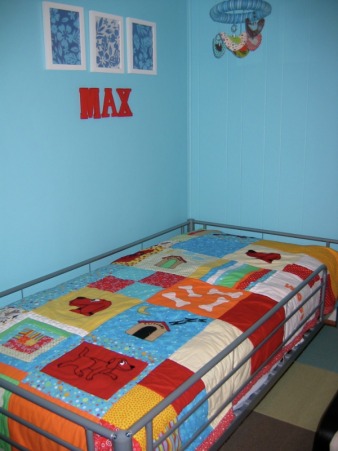
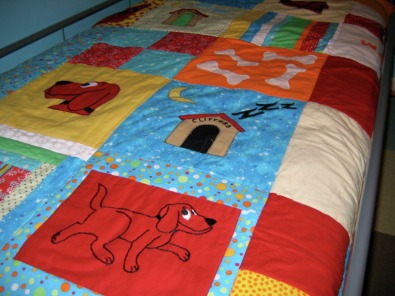
Three things are on my mind today. First, my baby slept in a big boy bed for the first time last night! All went well, except he somehow fell out (even with side rails) around 7:15 this morning, and then didn’t go back to sleep. Though he did lie there and talk to himself and play with his animals for almost an hour while I tried to go back to sleep in my room. I’m counting it as a success that he didn’t get out! He’s been super excited about the bed because I made him this Clifford-themed quilt, and gave it to him for his 2-year birthday a few weeks ago. Clifford is a big deal at our house, and Max was completely giddy last night when he finally realized that the Clifford quilt was going on his very own big boy bed!
I used both raw-edge applique and embroidery to make the Cliffords and Clifford-themed stuff.
I hope to do a tutorial about the quilt (I did both appliqué and embroidery). I’ll definitely offer some how-to in some fashion though, either actual templates or an explanation of how to make templates and transfer them.
Secondly, I’m working on Max’s backpack; he starts preschool in a month. How is it possible that my little boy is both sleeping in a regular bed and starting school?! We picked out the fabric for the backpack this weekend (he’s completely obsessed with saying “backpack” and every time he hears the word “school,” he shouts: “Backpack! Backpack!”).
I’m using a free pattern from Indietutes and doing a caterpillar appliqué from 100 Appliqué Motifs by Deborah “Ismoyo” Green (I can’t recommend this book enough for instant appliqué inspiration!). I'll post more on the backpack after I finish it.
And lastly, tonight at 7 p.m. is my book signing at Joseph-Beth Booksellers in Cincinnati! I have the feeling you have when you’re throwing a party and you think, “what if no one comes?” At least I know my family will be there! I’ve been so impressed by everything the wonderful people at Joseph-Beth have done to promote Sew Retro and the event tonight. I’ll be back with a full report on how it went!
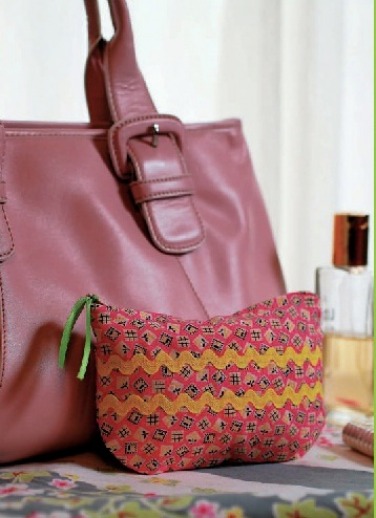
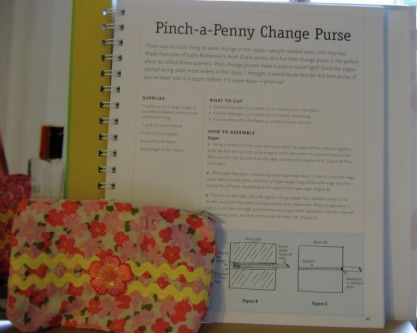
I decided to re-make the Pinch-a-Penny Change Purse for my upcoming book signing at Joseph-Beth Booksellers this Wednesday because I want to do a project giveaway. I know I created this project, and then made it for the book. But I’ll be honest, I haven’t really thought about it since. So when I went to make it the other night, I had to actually get out a copy of Sew Retro and read my own directions! And let me tell you what, there were some nervous moments as I flipped the pages. What if my directions were terrible? What if they no longer made sense? What if my brain wasn’t working the day I wrote them, and the 10,000 times after that I proofed them?
Thankfully, my directions made sense! My illustrations were clear! But it got me wondering if this is something that other craft book authors worry about? It’s pretty darn scary to put projects out there and then have people actually put their trust in you and make them. I’ve been writing for magazines for about ten years now, and I no longer get nervous about the articles I write, whether it’s about garden design or some complicated health topic. I just trust that I know how to research and interview and quote and boil it all down. But remembering to specify 5/8”-inch seams, and remembering to tell people to open the zipper before they sew up the sides so they’ll be able to turn the pillow—that’s another matter altogether! I would feel terrible if I led someone down the wrong path!
Case in point: when my sister, Laura, and I were driving to Chicago last weekend, I was getting so frustrated by the lack of good signage around the tollbooths. There are like 10 lanes and you’re trying to figure out which one to be in if you don’t have a freakin’ Ipass, but don’t want to exit. You’re trying to follow the signs, but the lanes keep shifting and you can’t tell which is the exit only lane and which is the cash lane, or if the exit only lane doesn’t even really mean exit. I kept saying to Laura: “There should to be signs every 20 feet or so that say: ‘Don’t worry, you’re still in the correct lane,’ and ‘Okay, now it looks like these lanes shift up ahead but really they don’t; stay where you are,’ or ‘Okay, now it’s time to make your final decision, do you have an Ipass or not?’” I like reassurance that I’m following the right path! I guess I like that when I sew, too. That’s what I was going for when I wrote the Sew Retro directions—reassurance that yes, you are supposed to put that seam right there. Yes, right there, even though it feels weird for a second.
So here’s to reassurance and following the right path . . .


 RSS Feed