Bonus Projects
Toddler Apron
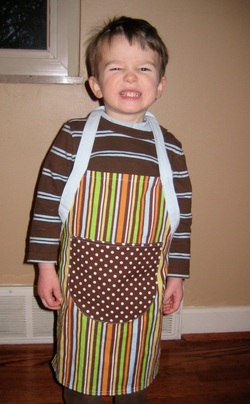
My 2-1/2-year old, Max, loves anything kitchen/cooking related. He’s in a big imitation phase, so he wants to be doing whatever my husband and I are doing. If my husband and I are in the kitchen with aprons on, he wants one, too! I searched for toddler aprons (appropriate for a boy), but I couldn’t find what I wanted. So I decided to create my own: I studied my apron that I’d made a few years back and just modified the design to work for a toddler. I didn’t line this apron because it’s not going to get heavy-duty use, but that would be an easy modification. (I did, however, line the pocket because I find it easier to line than to hem around a curve.) This is a one-size-fits-all pattern that I think will fit a pretty broad range of toddlers, but of course you can modify according to your toddler’s size. I made it to fit Max, who is about 36 inches tall, with a chest measurement of about 26 inches. It’s just slightly big, so that he has room to grow into it.
What You Need
What to Cut
Pocket:
Facing and straps:
How to Assemble
My 2-1/2-year old, Max, loves anything kitchen/cooking related. He’s in a big imitation phase, so he wants to be doing whatever my husband and I are doing. If my husband and I are in the kitchen with aprons on, he wants one, too! I searched for toddler aprons (appropriate for a boy), but I couldn’t find what I wanted. So I decided to create my own: I studied my apron that I’d made a few years back and just modified the design to work for a toddler. I didn’t line this apron because it’s not going to get heavy-duty use, but that would be an easy modification. (I did, however, line the pocket because I find it easier to line than to hem around a curve.) This is a one-size-fits-all pattern that I think will fit a pretty broad range of toddlers, but of course you can modify according to your toddler’s size. I made it to fit Max, who is about 36 inches tall, with a chest measurement of about 26 inches. It’s just slightly big, so that he has room to grow into it.
What You Need
- 5/8 yard for apron
- 6-inch by 7-inch scrap of contrast fabric for pocket
- 1/4-yard (not a fat quarter, unless you want to do a lot of piecing) of fabric for facing/straps and pocket lining
What to Cut
- Download pattern piece here and print on a standard size piece of paper.
- Add 8 inches to the bottom (or modify for your toddler)
- Place on fold and cut.
Pocket:
- Cut one 6-inch by 7-inch rectangle from contrast fabric
- Cut same size rectangle from lining fabric
Facing and straps:
- Cut two 33-inch by 3-inch strips
How to Assemble
Pocket:
Note: The 7-inch side is the pocket width.
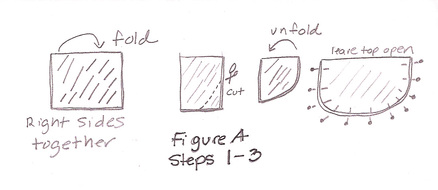
1. Loosely pin right sides together and then fold the pinned together layers in half, so that you can easily round the corners on both sides in just one step.
2. Trace the round edge of something in the corner (or just freehand it).
3. Unfold. Pin around sides and bottom of pocket. Stitch all the way around, leaving top open. (Figure A)
4. Turn right-side out. Fold the top edges under 1/2-inch and then edge-stitch. Do a second row of stitching 1/4-inch below if you want.
5. Open out your apron piece. Place pocket on the apron front where you want it, pin (or hand-baste) and then top-stitch it in place.
Note: The 7-inch side is the pocket width.
1. Loosely pin right sides together and then fold the pinned together layers in half, so that you can easily round the corners on both sides in just one step.
2. Trace the round edge of something in the corner (or just freehand it).
3. Unfold. Pin around sides and bottom of pocket. Stitch all the way around, leaving top open. (Figure A)
4. Turn right-side out. Fold the top edges under 1/2-inch and then edge-stitch. Do a second row of stitching 1/4-inch below if you want.
5. Open out your apron piece. Place pocket on the apron front where you want it, pin (or hand-baste) and then top-stitch it in place.
Apron body:
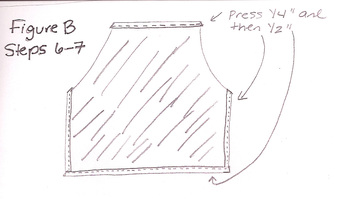
6. Hem the top edge: with wrong side facing you, press edge down 1/4-inch and then another 1/2-inch. Top-stitch 1/4-inch away from folded edge.
7. Hem sides and bottom: First press side edges under 1/4-inch and then another 1/2-inch. Top-stitch 1/4-inch away from folded edge. Repeat for the bottom edge. Press all hems. (Figure B)
Facing and straps
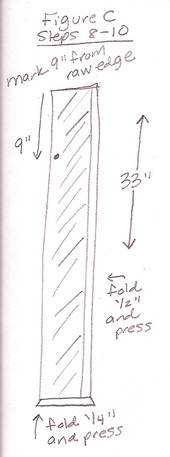
8. With wrong side facing you, press one LONG edge of the 33-inch piece over 1/2-inch.
9. With wrong side facing you, press one SHORT edge down 1/4-inch. That leaves one short edge and one long edge of each piece still raw.
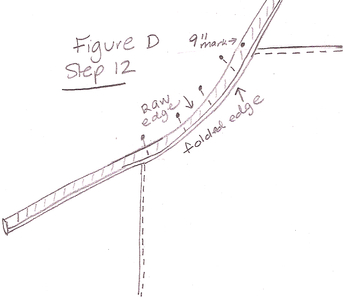
10. Measure 9 inches down from top raw edge of piece and mark. (Figure C)
11. Repeat steps 8 - 10 on other piece.
12. With right sides together, pin the unfolded side of the facing to the unfinished curved edge of the apron, matching raw edges. Start at your 9-inch mark and stop at the edge of the curve. (Figure D, below)
13. Stitch (using 1/2-inch seam allowance).
14. Clip curves of seam and then press seams away from apron.
15. Following the seam allowance created, continue folding (and then pressing) the raw edge under 1/2-inch, for both the side ties and the neck strap.
8. With wrong side facing you, press one LONG edge of the 33-inch piece over 1/2-inch.
9. With wrong side facing you, press one SHORT edge down 1/4-inch. That leaves one short edge and one long edge of each piece still raw.
10. Measure 9 inches down from top raw edge of piece and mark. (Figure C)
11. Repeat steps 8 - 10 on other piece.
12. With right sides together, pin the unfolded side of the facing to the unfinished curved edge of the apron, matching raw edges. Start at your 9-inch mark and stop at the edge of the curve. (Figure D, below)
13. Stitch (using 1/2-inch seam allowance).
14. Clip curves of seam and then press seams away from apron.
15. Following the seam allowance created, continue folding (and then pressing) the raw edge under 1/2-inch, for both the side ties and the neck strap.
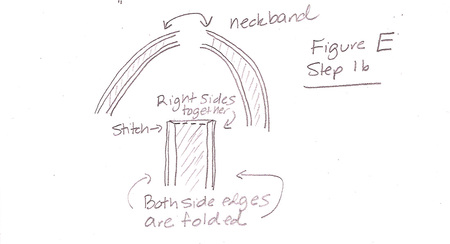
16. With right sides together and both side edges folded, stitch the top raw ends together to form the neck strap. (Figure E)
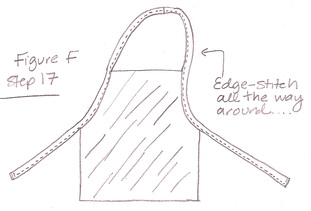
17. Turn facing to inside, where the folded edge will just cover the seam line. Pin, and continue pinning folded edges together on both side ties and neck straps. With wrong side facing you, edge-stitch along folded edge, starting at the end of one tie and continuing all the way around curve, through neck strap and down through the other side to the end of the other tie. (Figure F)
18. Press ties and neck strap.
19. Cook up a feast with your toddler!
18. Press ties and neck strap.
19. Cook up a feast with your toddler!
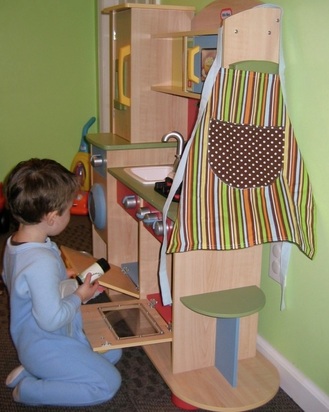
Max likes to hang his apron from his new play kitchen!
