Bonus Projects

Fabric Flower Pin
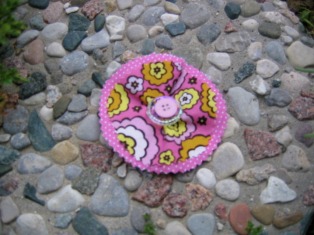
I recently make these fun flower pins at a make and take. People had the best time choosing coordinating fabrics and buttons! They're super easy to make, and very wearable.
What You Need
Assemble
I recently make these fun flower pins at a make and take. People had the best time choosing coordinating fabrics and buttons! They're super easy to make, and very wearable.
What You Need
- Scraps of two different fabrics
- One or two coordinating buttons in varying sizes
- Two different size circles to trace, approximately 4 inches and 3-1/2 inches in diameter (use what you have on hand, like coasters, bottom of a glass, water bottle, or bowl)
- Fabric marker
- A quarter (or similar-size circular object)
- Large safety pin or broach pin
Assemble
- Decide which fabric you want on top (the smaller circle) and which you want for the bottom layer (the larger circle).
- Trace your circles onto the wrong side of each piece of fabric (either make a paper template and then trace, or trace around the object directly onto the wrong side of the fabric).
- Cut each circle, and then pink around the edges.
- Pin layers together. Flip over so wrong side is facing you, and trace a quarter in the center of the circle.
- Use the tracing as a guide to take a running stitch around the center circle. Keep stitches about 1/4-inch long and fairly close together. Important: don’t knot your thread end. Instead, leave thread end long (about 3 inches), because you’ll need the thread ends to gather.
- End right next to your starting point, and leave the thread end long again. Remove the pins.
- Gently pull the threads, like you’re pulling a drawstring. Don’t force it too hard, because the thread can break. Let the middle of the circle cinch up, so it puckers (keep the little bulge on the wrong side). Flip it over to the right side and see if you’re satisfied with the shape the flower has taken; adjust your cinching evenly, and tie thread ends together in a secure knot (I usually tie 3 times) and trim.
- Sew on buttons: either knot your thread, or sew a knot. With the needle coming from behind, push your needle through the center. As your needle comes up, slip it through one of the holes on your base (larger) button. If you are sewing on two buttons (one stacked atop the other), first secure base button with several stitches. Then drop the second one onto your needle as it comes up. Keeping the two buttons straight (with the holes lined up) is the trickiest part! Take your time and sew back and forth several times until both buttons are secure. Sew a knot through your cinching to secure.
- Run a safety pin through the back of your flower and wear! You can also take a few stitches to secure the safety pin, or opt to use a traditional broach pin (which you can attach with stitching or glue)
