How to make a Clifford quilt
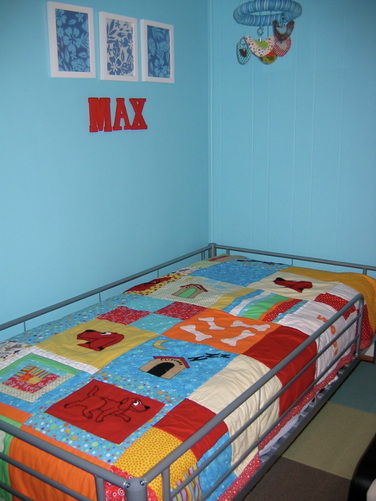
Big boy bed Clifford quilt
With all of the bedding licensing that goes on, you can buy just about any kind of character-themed quilt for your wee ones that you want. But I know you, dear Reader, you don’t always want to buy it. You want to make it! I’m right there with you. As I’ve written about on my blog, my two-year-old, Max, absolutely adores Clifford. I’m sure the Big Red Dog is available readymade, but I wanted to make Max a Clifford quilt for his first big boy bed. However, I knew that meant starting from scratch. There's not a lot of Clifford quilt inspiration on the web, and you have to be careful with copyright-protected stuff anyway. (And on that point, let me just emphasize in case any lawyers are reading that whenever you’re dealing with copyright protected images/patterns that you do not own, limit them to personal use only—never to sell, even at little local art fairs—unless you have written permission that specifies otherwise.)
Anyway, I thought I’d guide you through the process of creating your own Clifford quilt (or whatever character your little one loves).
Anyway, I thought I’d guide you through the process of creating your own Clifford quilt (or whatever character your little one loves).

Image after enlargement
1. Research your images.
I pulled all of my images from actual Clifford books (I especially liked Clifford’s Kitten because it has nice basic silhouettes of Clifford, good for appliqué and embroidery). Don’t worry so much about size at first, because you can reduce or enlarge. Look for images that will be easy to trace and duplicate either through appliqué or embroidery.
2. Decide your block size.
This all depends on how big you want your quilt to wind up. Mine was for a twin bed, and I wanted it to be in the range of 50-something inches by 90 inches. I’m usually more precise with math, but I knew I could wing this somewhat. I did some quick calculations, and decided to do 13-1/2” blocks (seven down and four across). That gave me an idea of how big I needed my appliqués and pieces of embroidery to be.
3. Make templates.
For the smaller pieces of appliqué (like the sun, moon, and dog bone images), I found images online, printed them out, tweaked here and there, and enlarged if necessary. I traced patterns out of Pellon and then cut them out of fabric.
For the Clifford images: I used basic 9” x 12” tracing paper (which you can buy in a pad at an art or office supplies store) to trace over the Clifford images from the book. I traced first in pencil, and then with a fine-tip black marker. Then I taped that piece of tracing paper to a piece of white paper (it copies better this way) and started playing around with enlarging on my copier. It took trial and error to get it right. Most of my tracings were enlarged somewhere between 150 – 200 percent. My all-in-one printer/copier/scanner only accommodates 8-1/2” x 11” paper, but that’s really all you need for this kind of quilt.
Basic raw edge applique
4. Decide on your medium.
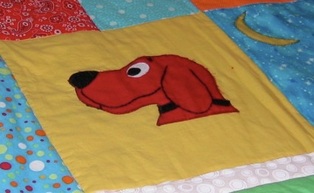
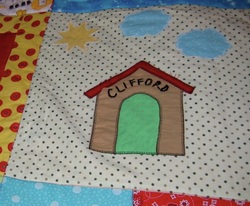
I wanted to do a mix of simple raw edge appliqué (using a machine blanket stitch) and embroidery. I knew that I could do basic shapes, like Clifford’s doghouse, with appliqué. (But I’d have to embroider the letters of his name.) Also, the Clifford images that were simple silhouettes, like the one of his head, could easily be appliquéd, with just a little embroidery detail for things like the ears. But some were so detailed, with so many small curves (paws, tails, tongues), that I knew my appliqué technique wouldn’t work. Doing embroidery allowed me to work in details that I wouldn’t have been able to capture with appliqué alone. I am fairly new to embroidery, and I can assure you: it’s not difficult to just do basic stitches (backstitch, split stitch, satin stitch). Google embroidery tutorials, or pick up the very excellent book Sublime Stitching.
I wanted to do a mix of simple raw edge appliqué (using a machine blanket stitch) and embroidery. I knew that I could do basic shapes, like Clifford’s doghouse, with appliqué. (But I’d have to embroider the letters of his name.) Also, the Clifford images that were simple silhouettes, like the one of his head, could easily be appliquéd, with just a little embroidery detail for things like the ears. But some were so detailed, with so many small curves (paws, tails, tongues), that I knew my appliqué technique wouldn’t work. Doing embroidery allowed me to work in details that I wouldn’t have been able to capture with appliqué alone. I am fairly new to embroidery, and I can assure you: it’s not difficult to just do basic stitches (backstitch, split stitch, satin stitch). Google embroidery tutorials, or pick up the very excellent book Sublime Stitching.
Reverse letters when using a transfer pencil
5. Transfer images.
This is the part I had to research. As I said, I knew that for basic appliqué, I could just make Pellon pattern pieces, and cut them out of fabric. But since I wanted to embroider some details first, that approach would only take me so far. How in the world was I going to get these images, with all of their fine details, transferred to fabric—dark red fabric at that? (Because it’s Clifford, after all, and he is nothing if not red.)
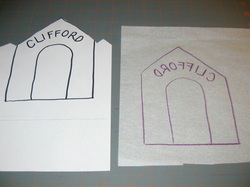
I used two methods. To transfer the name Clifford onto the doghouse (which I made from a lighter fabric) I used a red Dritz Iron-On Transfer Pencil. This works well on light-colored fabric. To use a pencil like this, you trace (very thickly) around the image/letters on your tracing paper (you can also use regular paper, but I find tracing paper easier to work with once I start ironing). Go around the image a few times until you have a nice coat of red on there.
Important : the image will be reversed. So, if you are doing letters, you need to write them backwards. It takes a few steps of tracing to do this. Trace the letters onto white paper using a thick marker (like a Sharpie) that will bleed through to the backside of the paper. Flip the paper over to the backside, so the letters are reversed, pop a piece of tracing paper on top and trace the backwards letters.
Okay, once you’ve traced around the image and/or the letters with your pencil, put the image, pencil-traced side down, onto your fabric. Using a cotton/no steam setting on your iron, press, holding for about 10 seconds and making sure to get all areas of the image. Don’t let the fabric or tracing paper move during the process. Pull up a corner (carefully) and check to make sure it transferred. You can always fill in places it didn’t transfer well with the pencil. Don’t cut it out yet—you want to do your embroidery first while you still have a big enough piece of fabric to get into a hoop.
This is the part I had to research. As I said, I knew that for basic appliqué, I could just make Pellon pattern pieces, and cut them out of fabric. But since I wanted to embroider some details first, that approach would only take me so far. How in the world was I going to get these images, with all of their fine details, transferred to fabric—dark red fabric at that? (Because it’s Clifford, after all, and he is nothing if not red.)
I used two methods. To transfer the name Clifford onto the doghouse (which I made from a lighter fabric) I used a red Dritz Iron-On Transfer Pencil. This works well on light-colored fabric. To use a pencil like this, you trace (very thickly) around the image/letters on your tracing paper (you can also use regular paper, but I find tracing paper easier to work with once I start ironing). Go around the image a few times until you have a nice coat of red on there.
Important : the image will be reversed. So, if you are doing letters, you need to write them backwards. It takes a few steps of tracing to do this. Trace the letters onto white paper using a thick marker (like a Sharpie) that will bleed through to the backside of the paper. Flip the paper over to the backside, so the letters are reversed, pop a piece of tracing paper on top and trace the backwards letters.
Okay, once you’ve traced around the image and/or the letters with your pencil, put the image, pencil-traced side down, onto your fabric. Using a cotton/no steam setting on your iron, press, holding for about 10 seconds and making sure to get all areas of the image. Don’t let the fabric or tracing paper move during the process. Pull up a corner (carefully) and check to make sure it transferred. You can always fill in places it didn’t transfer well with the pencil. Don’t cut it out yet—you want to do your embroidery first while you still have a big enough piece of fabric to get into a hoop.
 Tools for transfer |
 A mix of applique & embroidery |
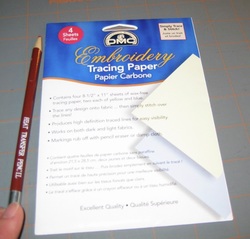
The second method I used was DMC Embroidery Tracing paper. It comes in a pack of four 8-/12” x 11” sheets; two are blue and two are yellow. I found both colors worked equally well, even on dark fabric. And it’s nice, because your image doesn’t get reversed. To use this paper, you layer your fabric first (right side up), then the embroidery tracing paper (with the colored side DOWN), and then your template on top (image up, facing you). It works best if your template is on regular white paper (versus tracing paper) because you’re going to have to press pretty hard on the paper and you’ll rip right through thin tracing paper.
So, your layers: pin them together in a few places so they don’t move, and then use a ballpoint pen to trace over your template, pushing pretty hard. The pressure from the ballpoint makes the chalky colored stuff on the embroidery tracing paper transfer to your fabric (the harder you push, the better the chalk transfers). Just be careful not to move the image at all. You’ll be left with the outline of your image on the fabric. It will gradually fade, especially if you’re moving an embroidery hoop around on it, so do the most detailed parts first. If your embroidery or stitching doesn’t cover all of the chalk outline, it washes off easily with a damp cloth (just don’t iron it first).
Remember, if you are doing a mix of appliqué and embroidery, do your embroidery first (so don’t cut the image out yet). It’s much easier to embroider a small piece of fabric that’s just one layer than it is once it’s appliquéd to fabric (in my opinion).
As for finishing details, I used both felt and embroidery for Clifford’s eyes and nose, depending on the size of the Clifford. Felt was easier for the nose and eyes on the Clifford head silhouettes, but a satin stitch worked okay for the smaller Cliffords.
6. Assemble all your blocks and finish!
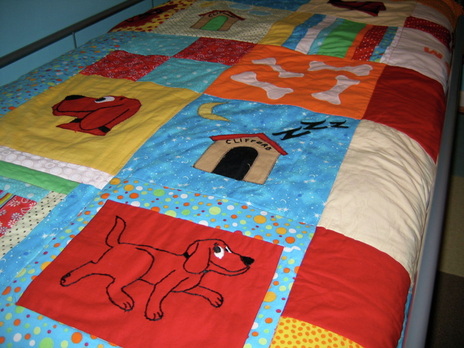
This is the fun part! In my Clifford quilt, I wanted a random pattern of solid colors, mixed in with patch-worked pieces (basic squares, log cabin, and stripped-pieced blocks). I actually took some Clifford books to the fabric store with me for color ideas, to make sure I was getting the right yellows, blues, greens, reds, and oranges. I filled in the rest with scraps. Obviously, you can get as fancy as you want here. But when you have strong images already (like a giant Clifford head), I think keeping it simple makes sense. I chose a funky polka dot cotton flannel for the back. From there, it was about color balancing, straight stitches, a thin border on the sides of the quilt, and stitch-in-the-ditch machine quilting.
A final note: When choosing batting, I always recommend going with the most natural cotton/organic/dye-free/adhesive free stuff you can find. Little lungs don’t need to be breathing all that nasty stuff that I suspect off-gasses from the cheaper, conventional batting.
I hope this quasi-tutorial on making a Clifford quilt has been helpful!
