How to make a yo-yo
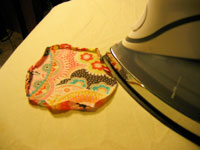
Figure 1
I adore yo-yos! The great regret of my sewing life is that I only recently discovered how much I love them. Now I look for every opportunity to make these flirty circular adornments. Follow these easy directions to make one, or watch me make one on the Fox19 Morning Show.
1. You can make a yo-yo in any size. Your completed yo-yo will be about half the size of your template circle. My favorite template is CD/DVD. Trace it (or something similarly sized) onto a piece of paper (to make a template you can re-use) or right onto the fabric itself.
1. You can make a yo-yo in any size. Your completed yo-yo will be about half the size of your template circle. My favorite template is CD/DVD. Trace it (or something similarly sized) onto a piece of paper (to make a template you can re-use) or right onto the fabric itself.
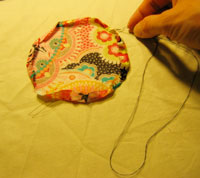
Figure 2
2. Press the edge of the circle up about 1/4-inch. Work your way all the way around the circle. Take little tucks as you press to make it easier. Don’t worry about it being perfect. To make this easier, you can also take a machine-baste stitch all the way around the circle, using a 1/4-inch seam allowance; it helps the fabric fold much easier. (Figure 1)
3. Do a basic running stitch by hand (like a hand-basting stitch, just tighter and more even). A double-threaded needle makes it more sturdy (though regular single-threaded is okay too). Leave the threads end long, and stitch all the way around, close to the fold, until you get back to your starting point. Working with a double-threaded needle can be a pain (the thread likes to twist and knot); keep smoothing it as you stitch. (Figure 2)
3. Do a basic running stitch by hand (like a hand-basting stitch, just tighter and more even). A double-threaded needle makes it more sturdy (though regular single-threaded is okay too). Leave the threads end long, and stitch all the way around, close to the fold, until you get back to your starting point. Working with a double-threaded needle can be a pain (the thread likes to twist and knot); keep smoothing it as you stitch. (Figure 2)
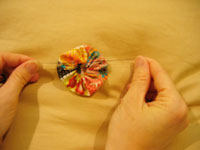
Figure 3
4. Leave the remaining thread ends long. Pull gently, but evenly, on each side like a drawstring to gather. As you gather, the edge of the circle starts drawing inward, creating the yo-yo. Adjust your gathers. (Figure 3)
5. Tie your thread ends together a few times to secure on each side; trim the thread ends and tuck inside.
5. Tie your thread ends together a few times to secure on each side; trim the thread ends and tuck inside.
